How to Set Up a Claude Team Plan: Payment, Inviting Members, and Allowing Gmail Addresses
Want two or more people at your company on Claude with one bill and no training on your content? This screenshot walkthrough covers the whole Claude Team signup: upgrading from the account menu, choosing seats and paying, creating the team, inviting members, adding gmail.com to allowed domains, turning off the invite link so strangers can't take your seats, and what members see when they join. Includes real Taiwan prices as of October 2026.
 卡住很正常——點段落旁的 😵 卡關 讓我們知道,或直接往下滾到問答區發問。
也可以用 👍 看懂 / 😢 看不懂 告訴我們哪裡寫得好、哪裡要改。
卡住很正常——點段落旁的 😵 卡關 讓我們知道,或直接往下滾到問答區發問。
也可以用 👍 看懂 / 😢 看不懂 告訴我們哪裡寫得好、哪裡要改。
In one line: Claude Team is the company plan for 2–150 people — account menu → Upgrade plan → switch to the Team & Enterprise tab → Get Team plan, name your team, pick seats, pay, done. The step most people trip on is inviting: a member’s email domain must be on the allowed-domains list, so for coworkers on Gmail you first add
gmail.com. After that, turn off the invite link — otherwise any Gmail user who gets hold of the link can join automatically and take a paid seat.
Keywords: Claude Team, Claude Team plan, Team plan signup, Standard seat, Premium seat, invite members, allowed email domains, gmail.com, invite link, organization settings, Keep both accounts
Why Team instead of everyone buying their own Pro?
If two or three people at your company are already paying for Claude Pro on their own cards, sooner or later you hit these problems:
- Messy expenses: one receipt per person, separate renewals, and an ex-employee’s subscription still charging.
- Unclear data ownership: coworkers handle company documents in personal accounts. When they leave, those conversations leave with them.
- Nobody’s in charge: who can use it, how much, and which outside services it connects to is left to individual judgment.
The Team plan pulls all of that back to the organization: one bill, centrally managed members, and by default your content isn’t used to train models. You only need 2 seats to start.
Before you start: have these three things ready
- An account to act as the owner — ideally sign in to a separate Claude account with a company-domain email (e.g.
admin@yourcompany.com) rather than an employee’s personal account. This account becomes the team’s Primary Owner and controls billing and members. - A credit or debit card (or Apple Pay).
- The list of member emails. Check whether anyone uses Gmail or another non-company address — you’ll need one extra step for them.
Pricing first: what it actually cost in October 2026
Prices shown on screen during a real signup in Taiwan on 2026-10-09 (New Taiwan Dollars, including 5% VAT):
| Seat type | Annual (per month avg.) | Monthly | Who it’s for |
|---|---|---|---|
| Standard seat | NT$630/mo (NT$7,560/yr) | NT$790/mo | Most people: everyday chat, writing, organizing information |
| Premium seat | NT$3,200/mo (NT$38,400/yr) | See checkout | Heavy users: 5× the usage of a Standard seat |
- Anthropic’s official USD pricing: Standard seat US$20 (annual) / US$25 (monthly); Premium seat US$100 / US$125.
- You can mix seat types in one team — e.g. one Premium seat for your heaviest user, Standard for everyone else.
- Enterprise is for 20+ users, with a seat fee plus usage-based billing. Not covered here.
- Prices change. Trust what the checkout page shows on the day you pay.
Step 1: Sign in with the owner account
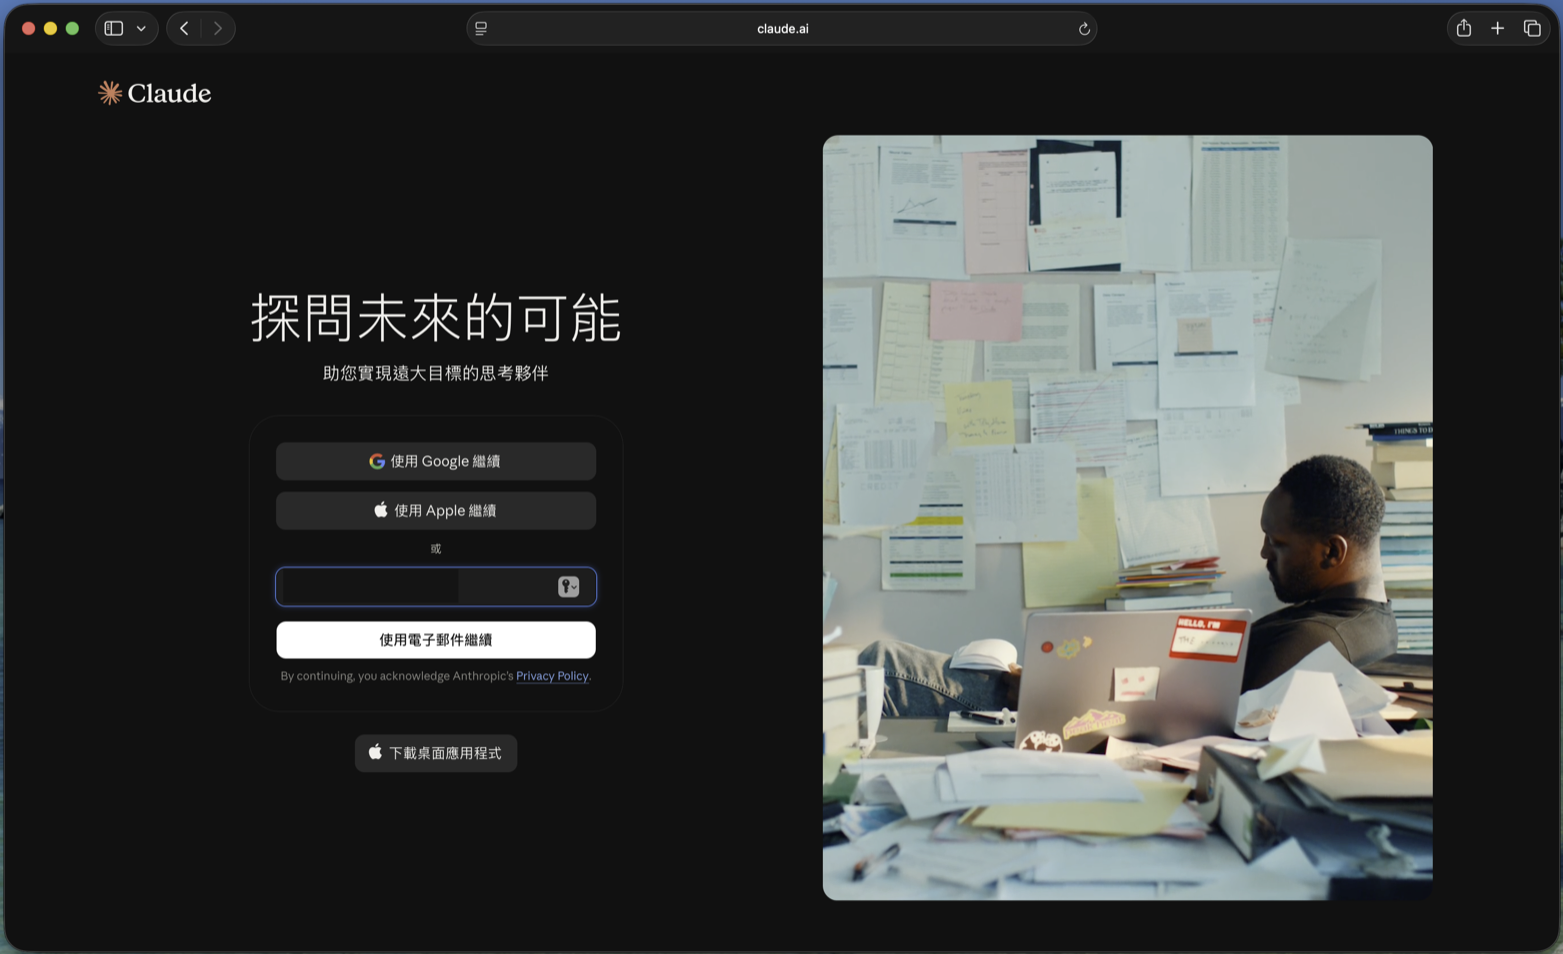
- Go to claude.ai
- Sign in with Google, Apple, or email. We recommend typing your company email and clicking “Continue with email”
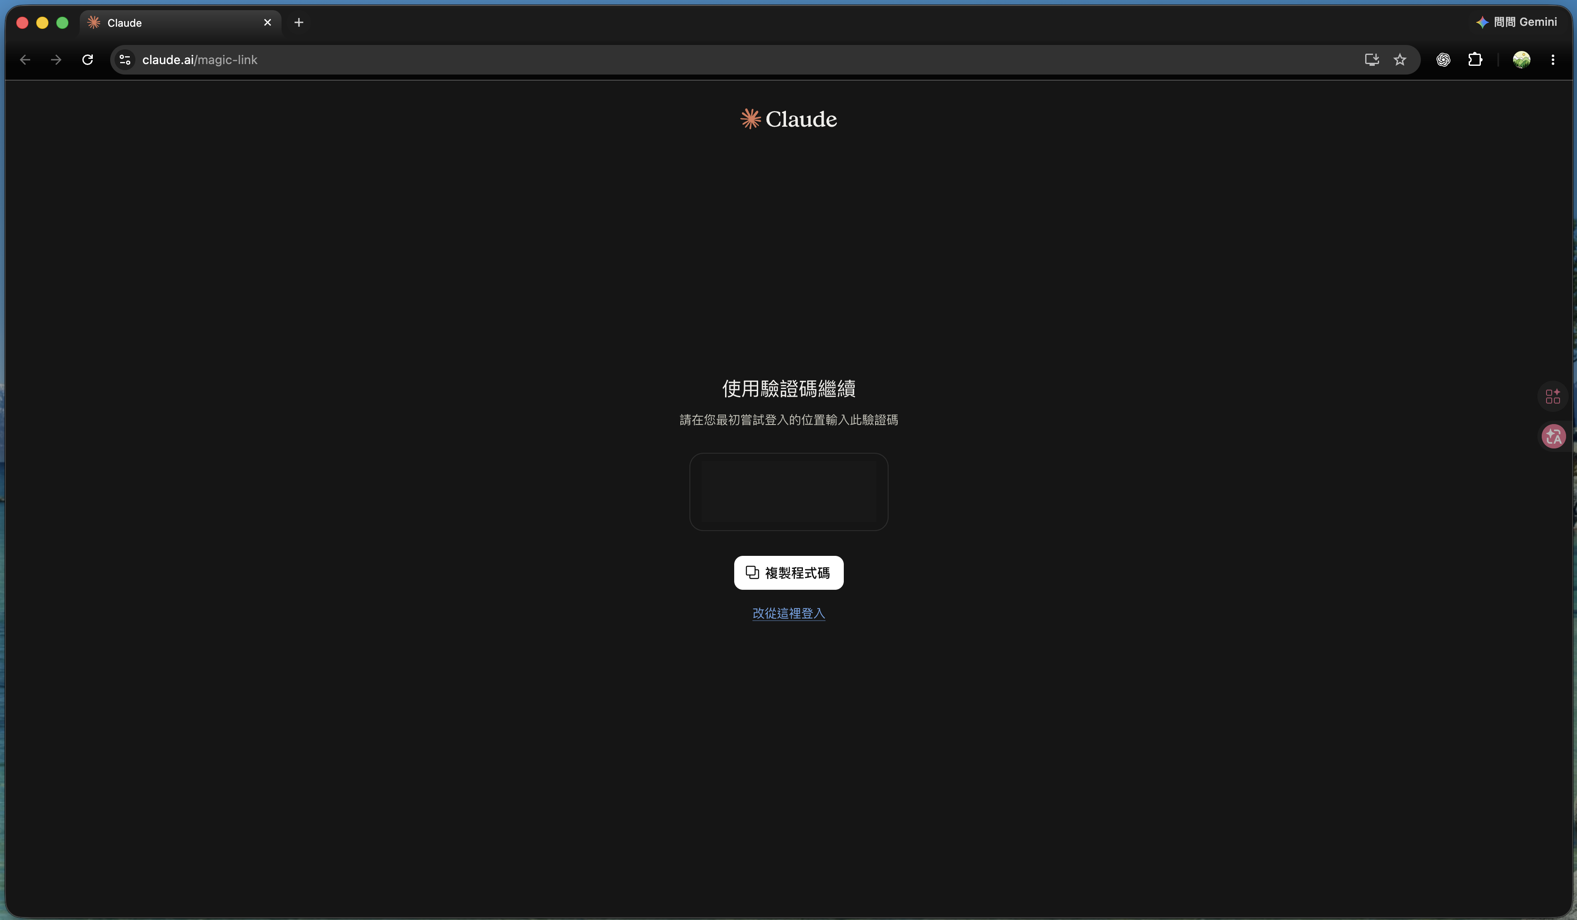
If you sign in with email, you’ll get a sign-in message. If you open its link in a different browser or device (e.g. your phone), the page shows a verification code instead — type that code back into the browser where you started signing in.
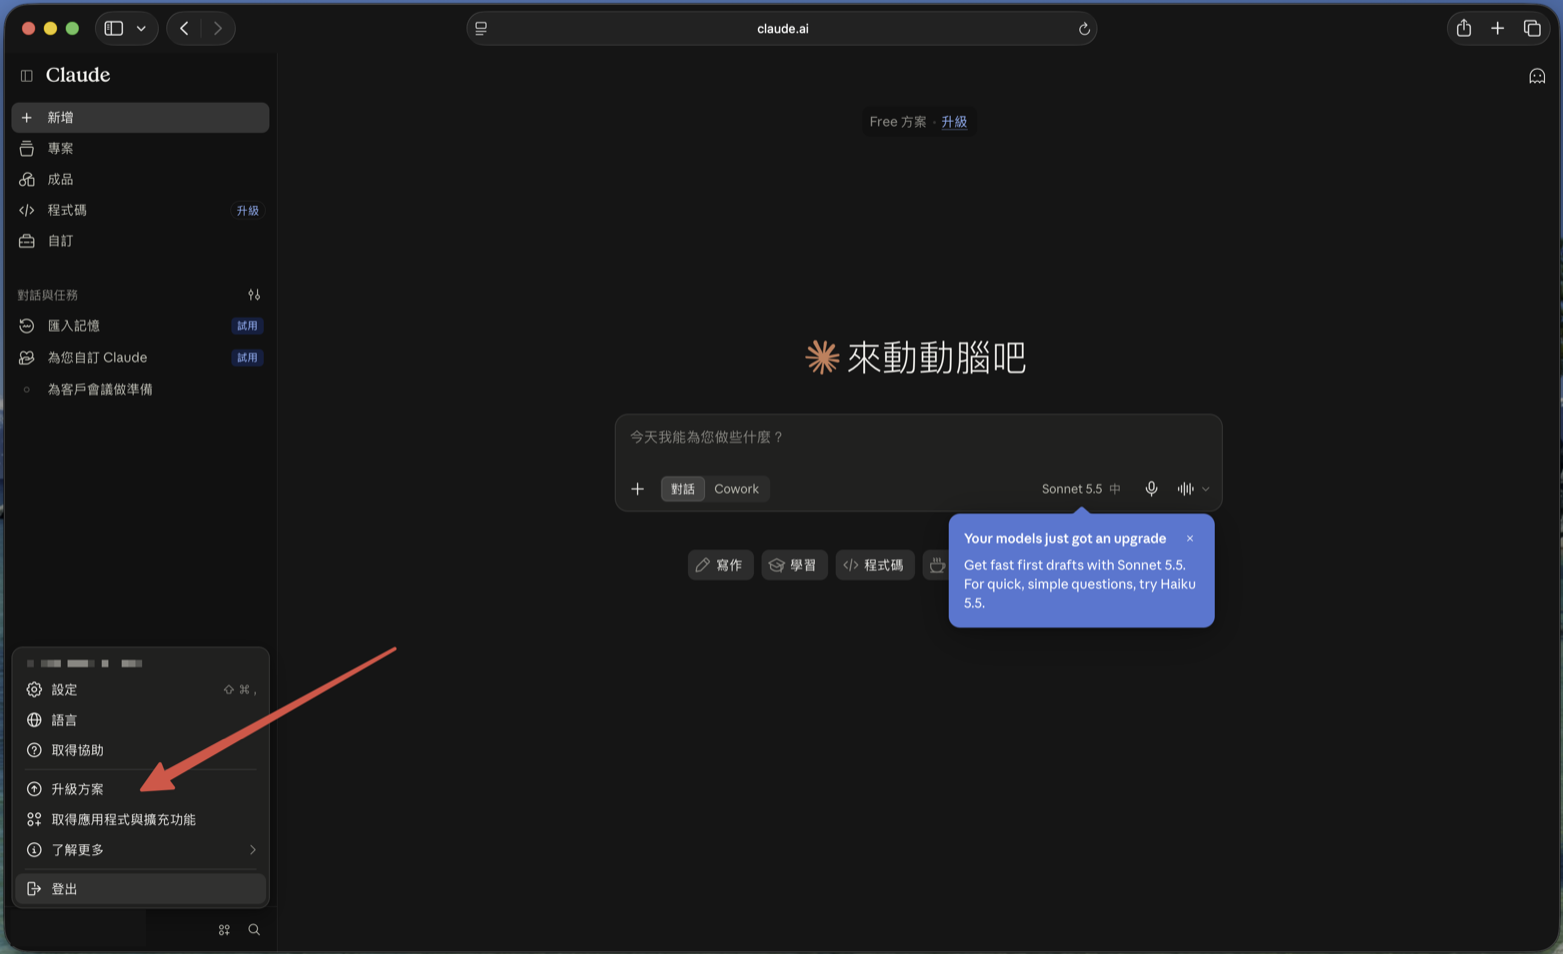
Step 2: Click “Upgrade plan” in the account menu
Once signed in, click your account name in the bottom-left corner, then choose Upgrade plan.
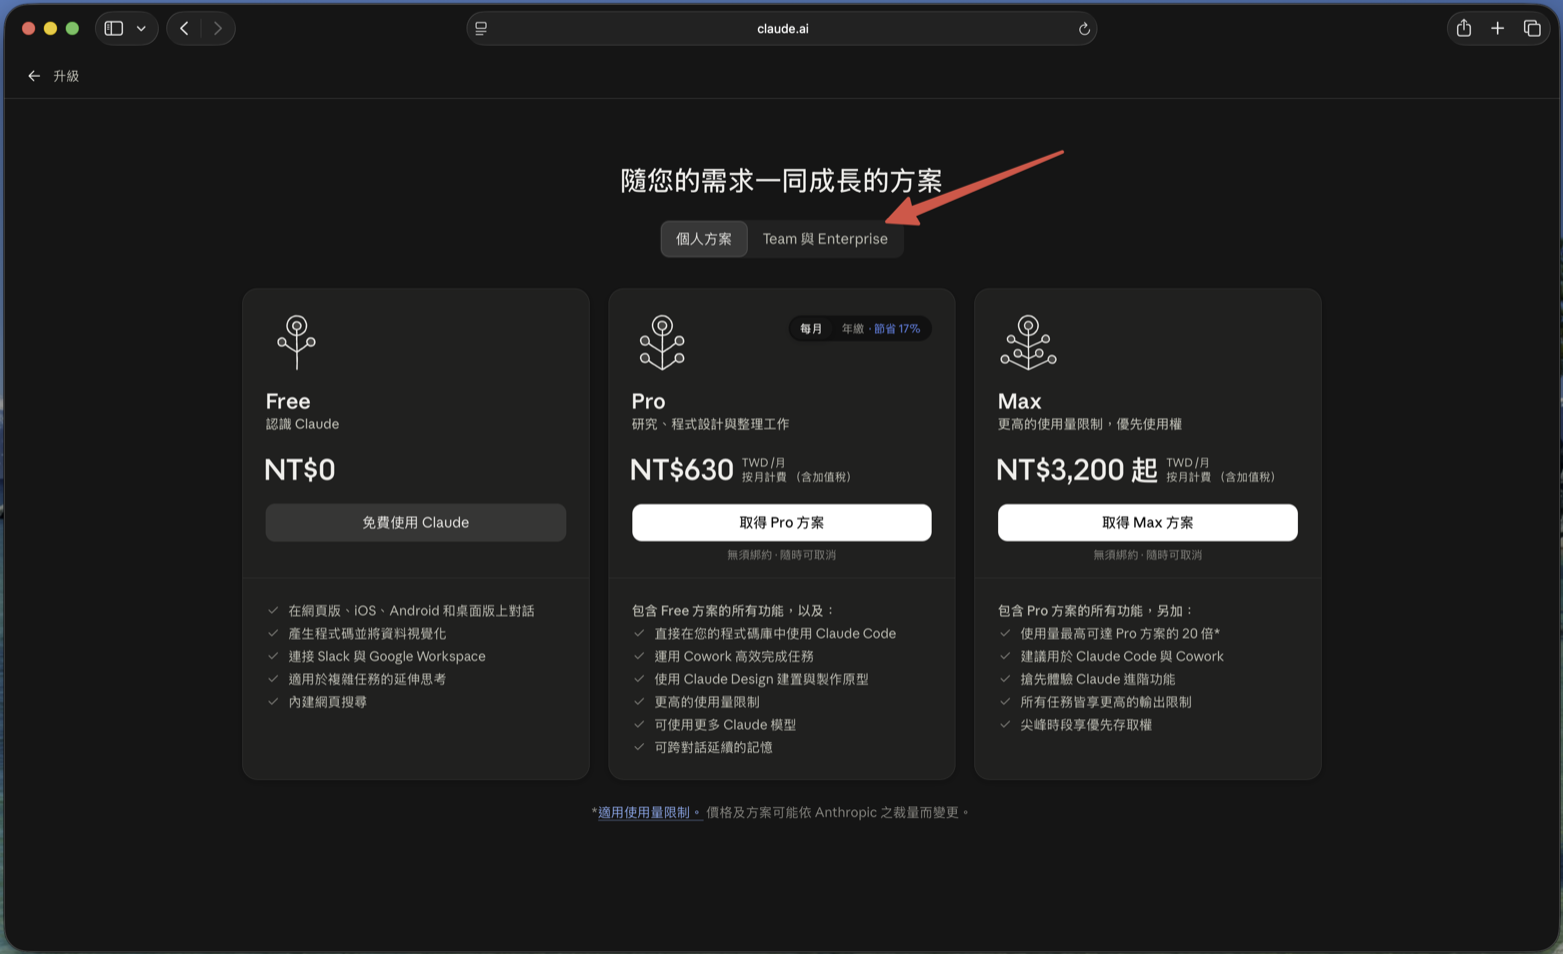
Step 3: Switch to the “Team & Enterprise” tab
The upgrade page opens on Individual plans (Free / Pro / Max). Team isn’t there — click the Team & Enterprise tab at the top.
Step 4: Pick Team and click “Get Team plan”
The Team card on the left is the one you want (2–150 users). Toggle “Monthly / Annual” at the top to compare prices, then click Get Team plan at the bottom.
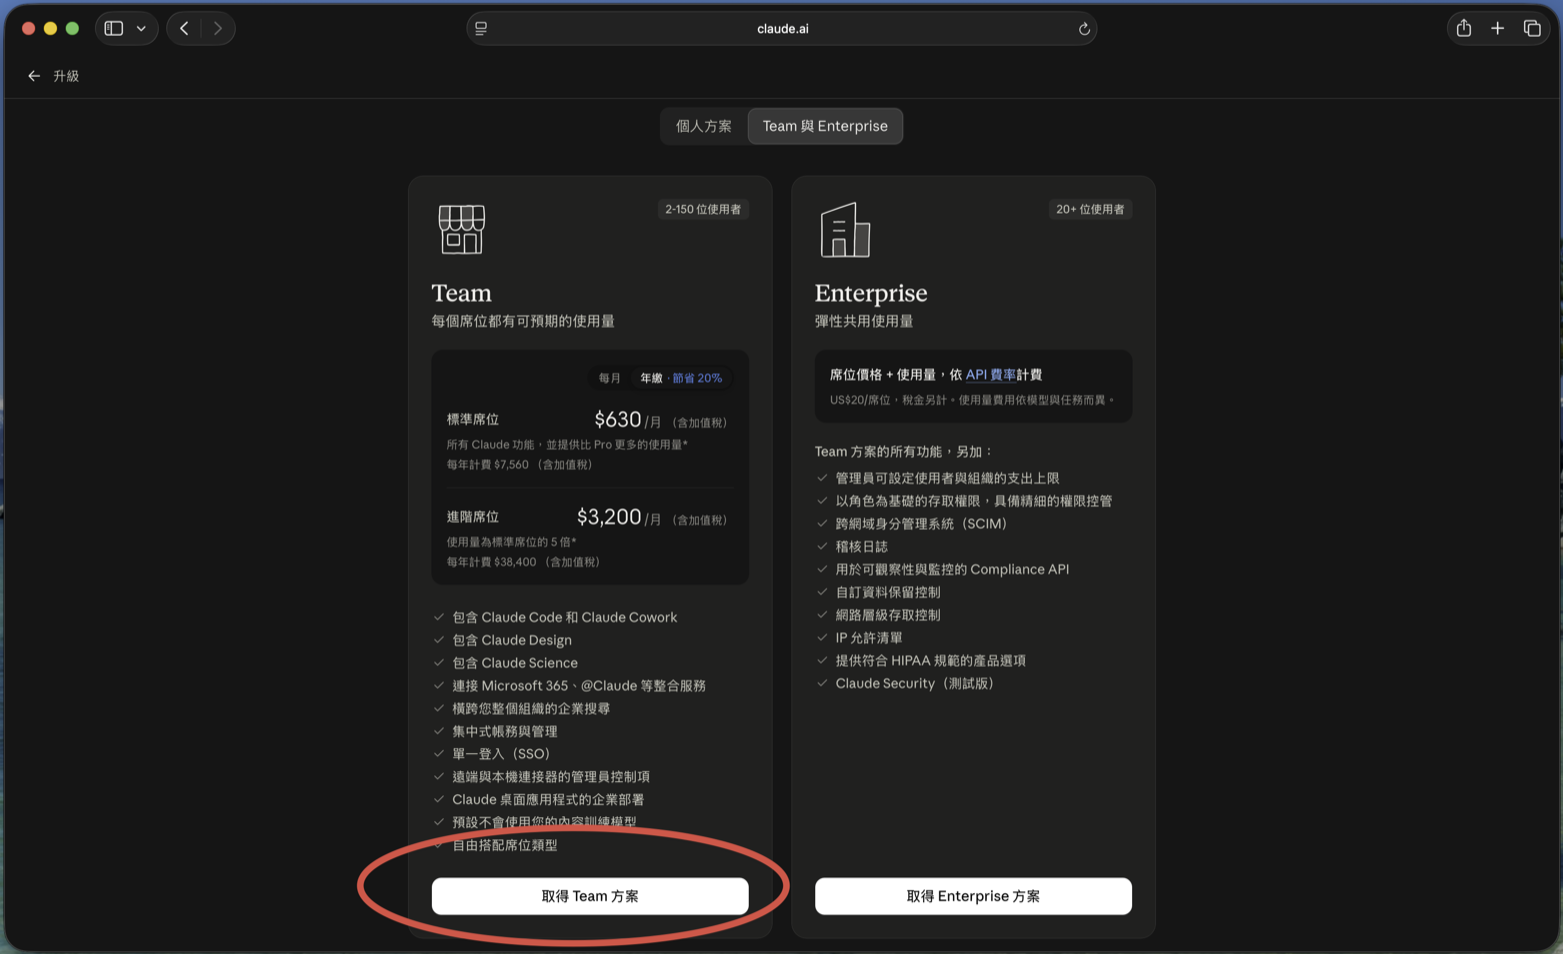
Highlights of the Team plan: Claude Code and Cowork, Claude Design, Microsoft 365 and other integrations, single sign-on (SSO), central billing and administration, and no model training on your content by default.
Step 5: Name the team and keep your personal account separate
- Enter your company or department name under “Team name” — members will see this name on their invitation, so pick something they’ll recognize
- Leave “Keep your personal account separate” checked: Claude creates a new workspace for the team, and this account’s existing chats and projects stay in your personal account instead of mixing with the company’s
- Click Continue
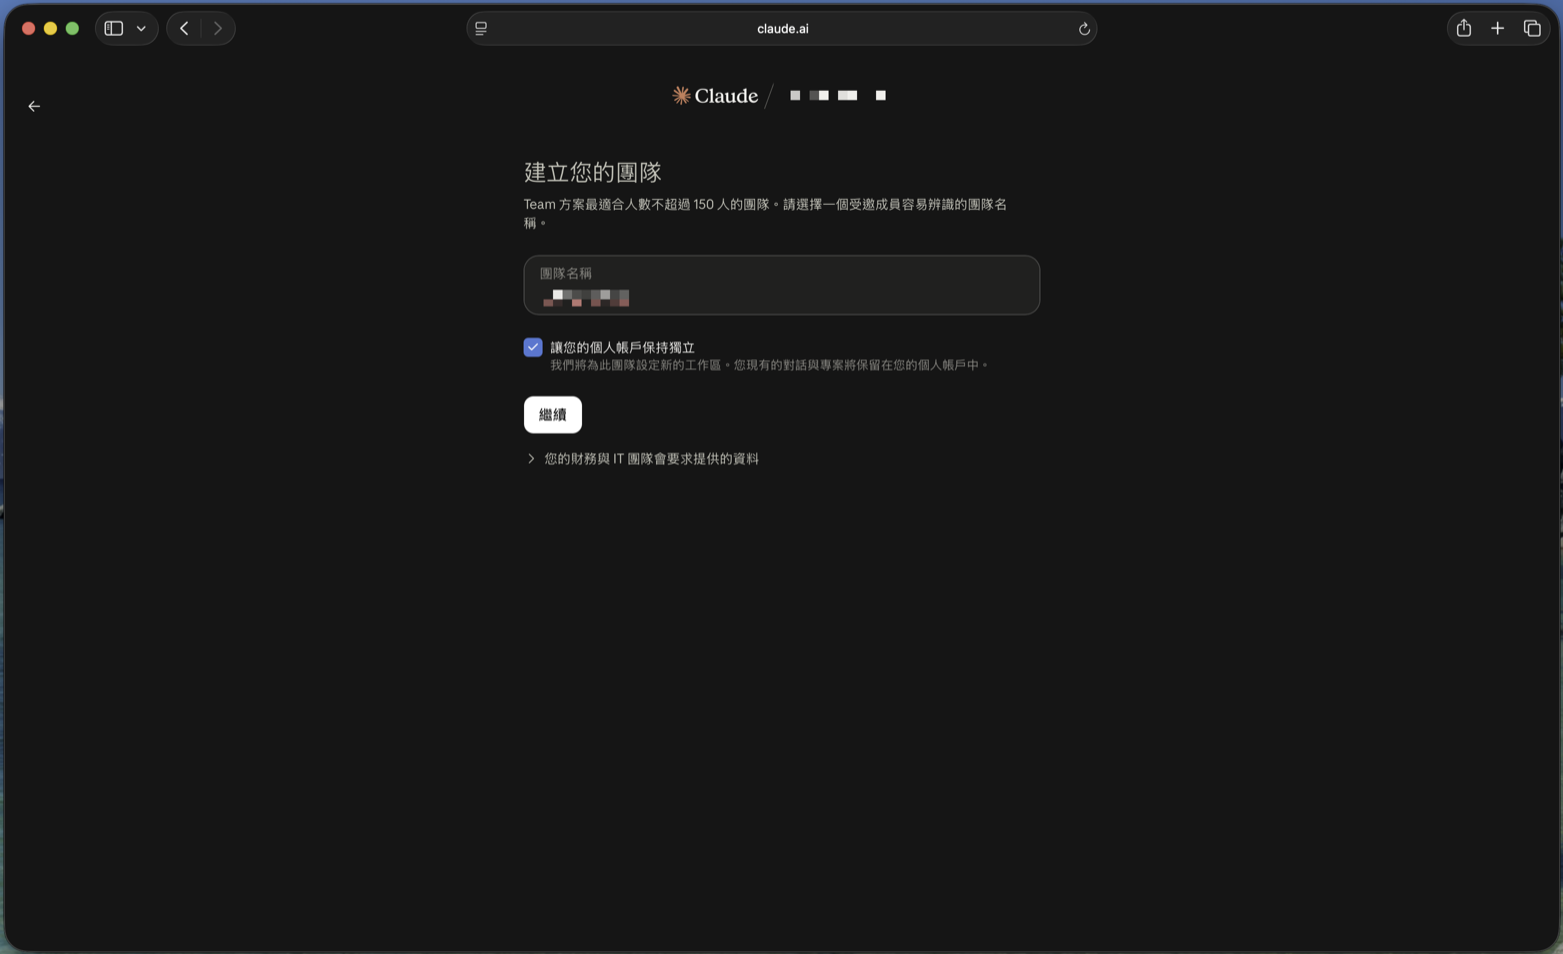
Step 6: Choose seats and payment
- Pick Monthly or Annual (annual saves 20%)
- Team needs at least 2 seats; click Adjust seat count for more
- Scroll down and fill in payment details: full name, country or region, postal code, then Card or Apple Pay
- Check the “Total due today” and complete payment
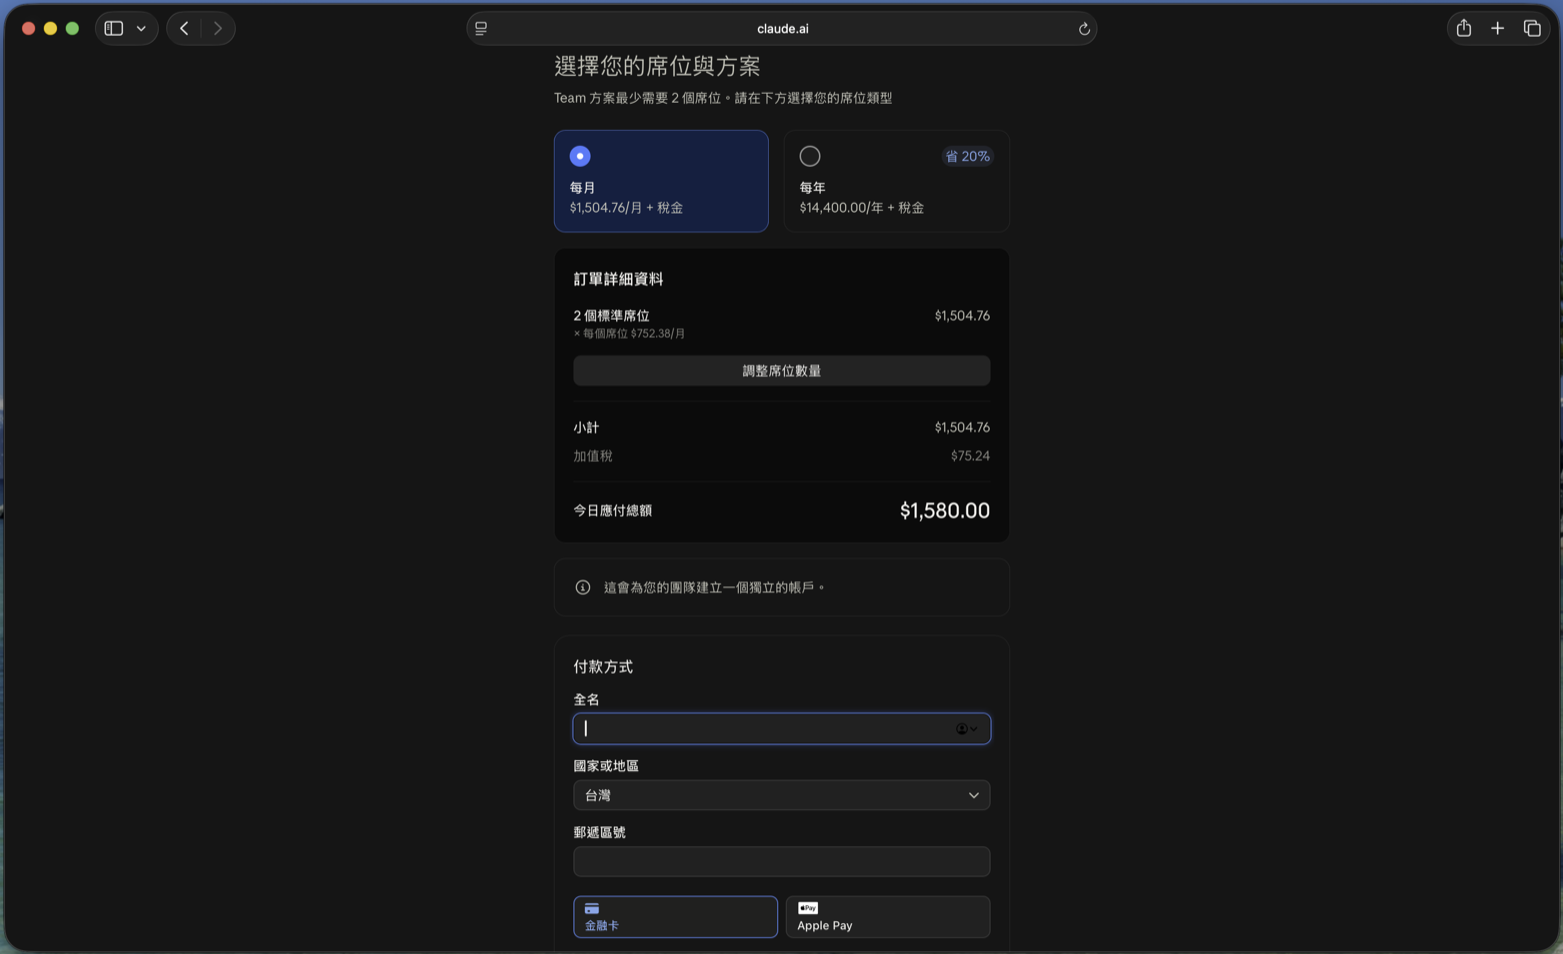
In this example: 2 Standard seats billed monthly, subtotal 1,504.76 + VAT 75.24, 1,580 due today. (On a Taiwan checkout, the $ is New Taiwan Dollars.) That works out to NT$790 per seat per month.
Step 7: Invite members (you can skip this for now)
After payment you land on “Invite members to your team”. You can:
- Type emails into the “Standard seats” box, pressing Enter after each one, or upload a CSV
- Click Copy invite link
- Or click Skip, continue without inviting and invite people later from settings
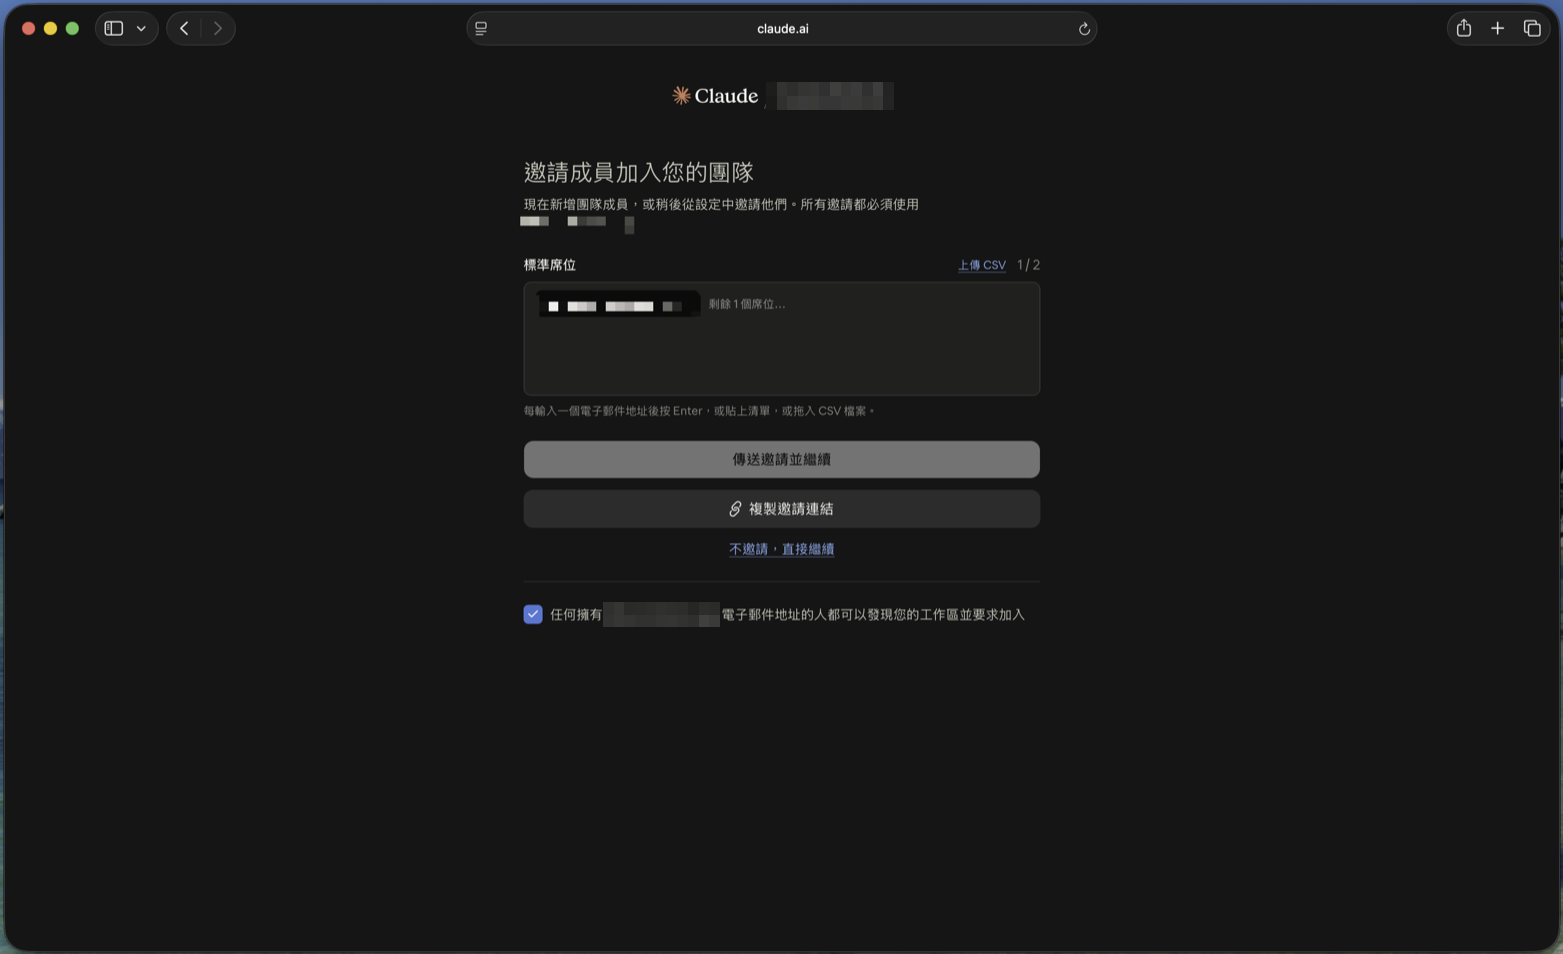
Note the line in the description: all invitations must use your company’s email domain. If someone you want to invite uses Gmail, the invite won’t go through here. Skip for now, follow Step 9 to allow Gmail, then come back.
Step 8: Get to know the “Organization and access” page
Inside the team, open Settings from the bottom-left account menu. The left sidebar now has a whole set of organization settings. The one you’ll use most is Organization and access:
- Team overview: allowed email domains, total seats (e.g. “2 (1 available)”), and total members
- Get your team using Claude: a starter checklist — add another owner, invite members, verify your domain, set up SSO
- Organization instructions: guidance for Claude that applies to every conversation in your organization (answer format, data-handling rules, and so on). Changes can take up to an hour to apply
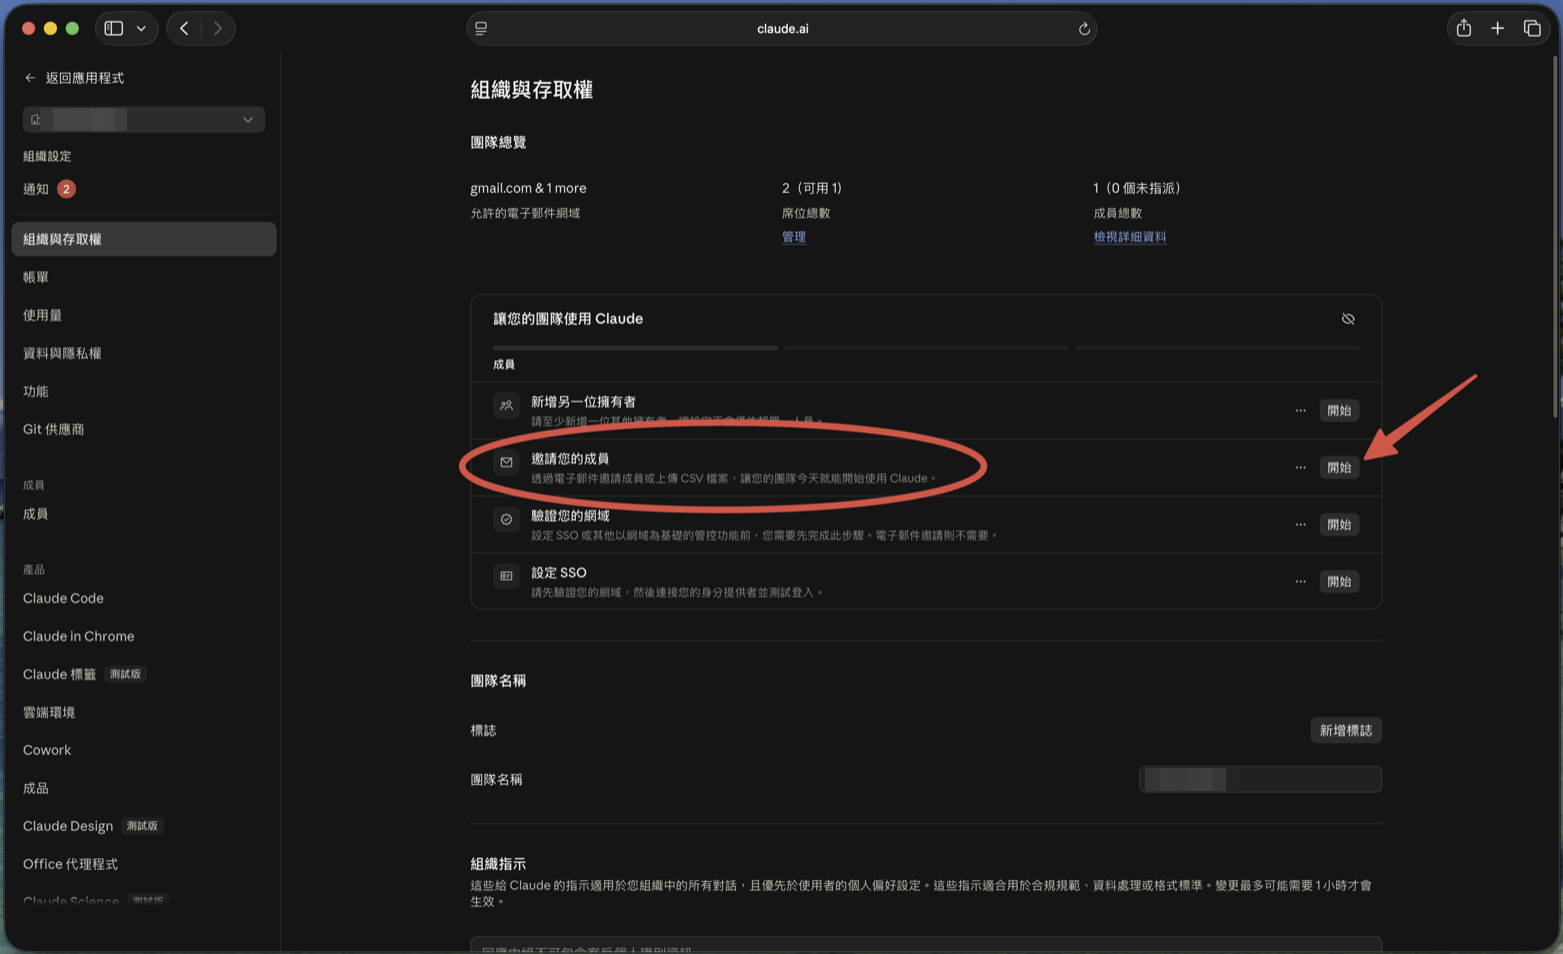
Click Start next to “Invite your members”, or go to Members in the sidebar → Add member in the top right. This dialog appears:
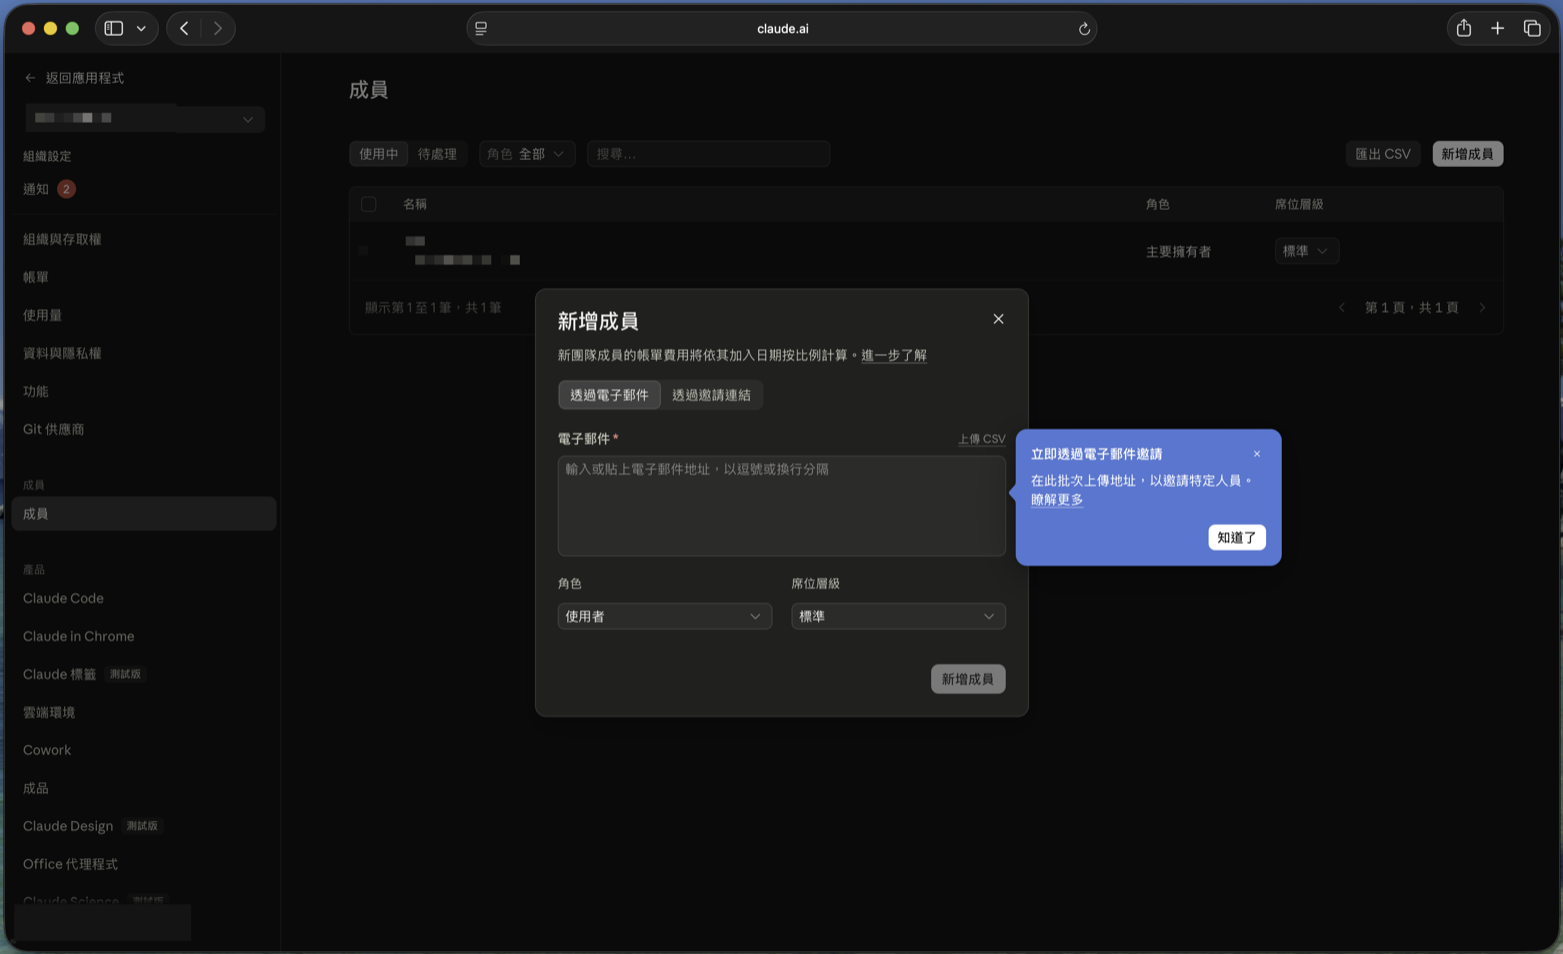
- Email: paste several at once, separated by commas or line breaks
- Role: “User” for regular coworkers
- Seat tier: “Standard” or “Premium”
- The dialog says it plainly: new members are billed pro rata from the date they join
💡 Add at least one more owner (the first item on the checklist). If there’s only one owner and that person leaves or loses access, nobody can manage billing.
Step 9: Coworkers on Gmail? Add gmail.com to allowed domains
This is where most people get stuck. By default the team only accepts emails on the owner’s own domain. Look at Allowed email domains in the team overview:
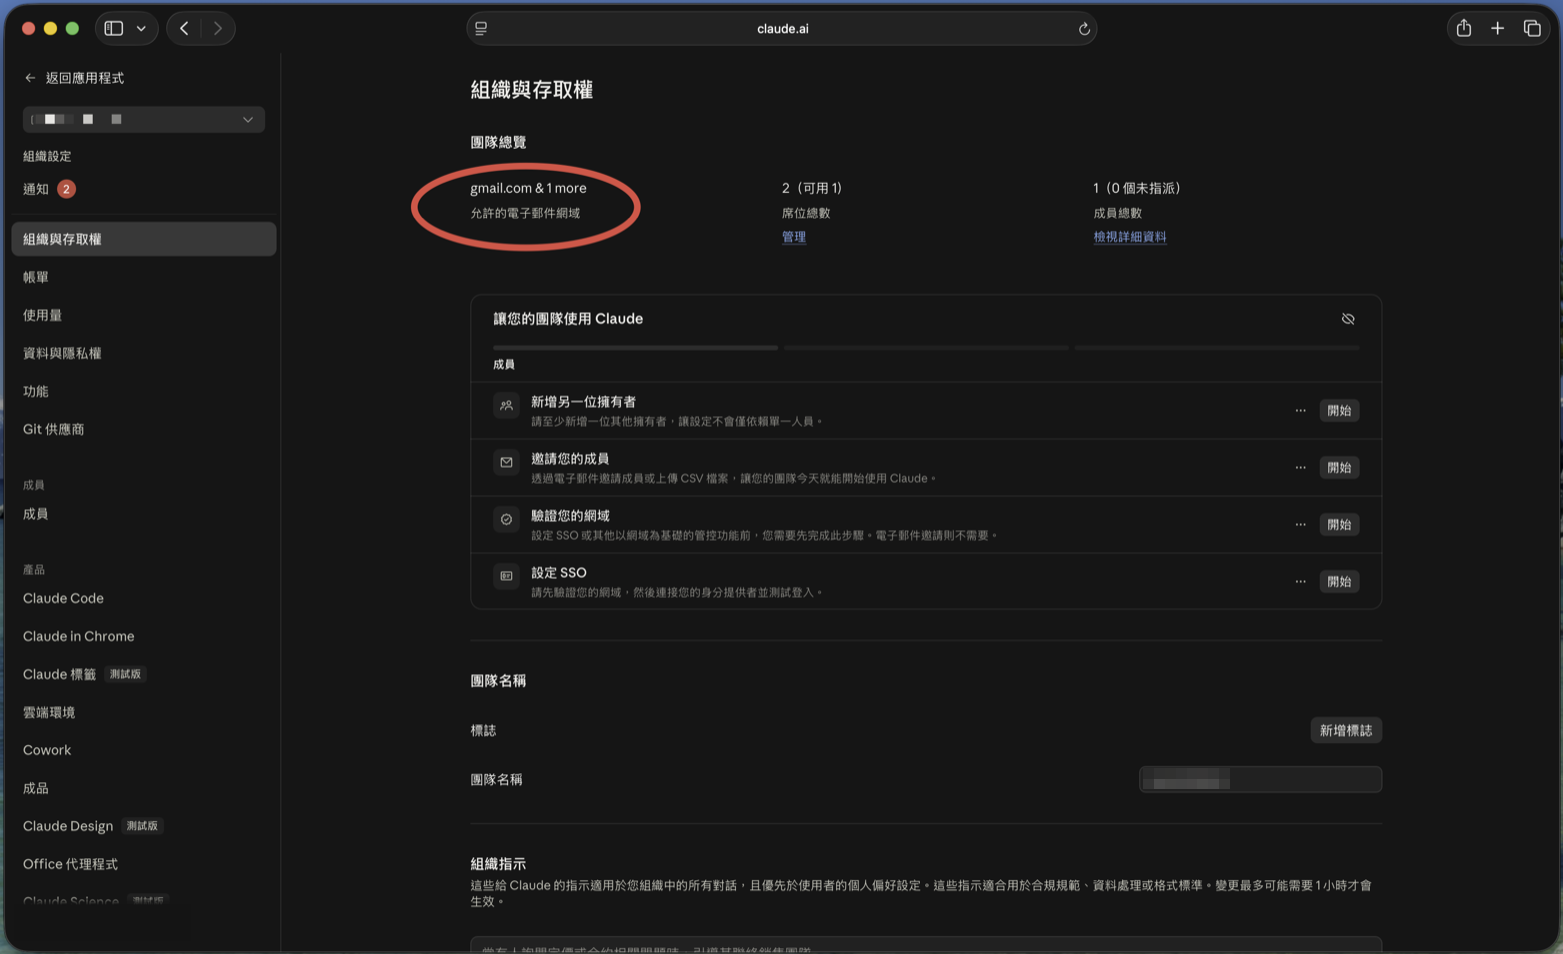
- On Organization and access, scroll down to the Domains section
- Click Add or edit domains
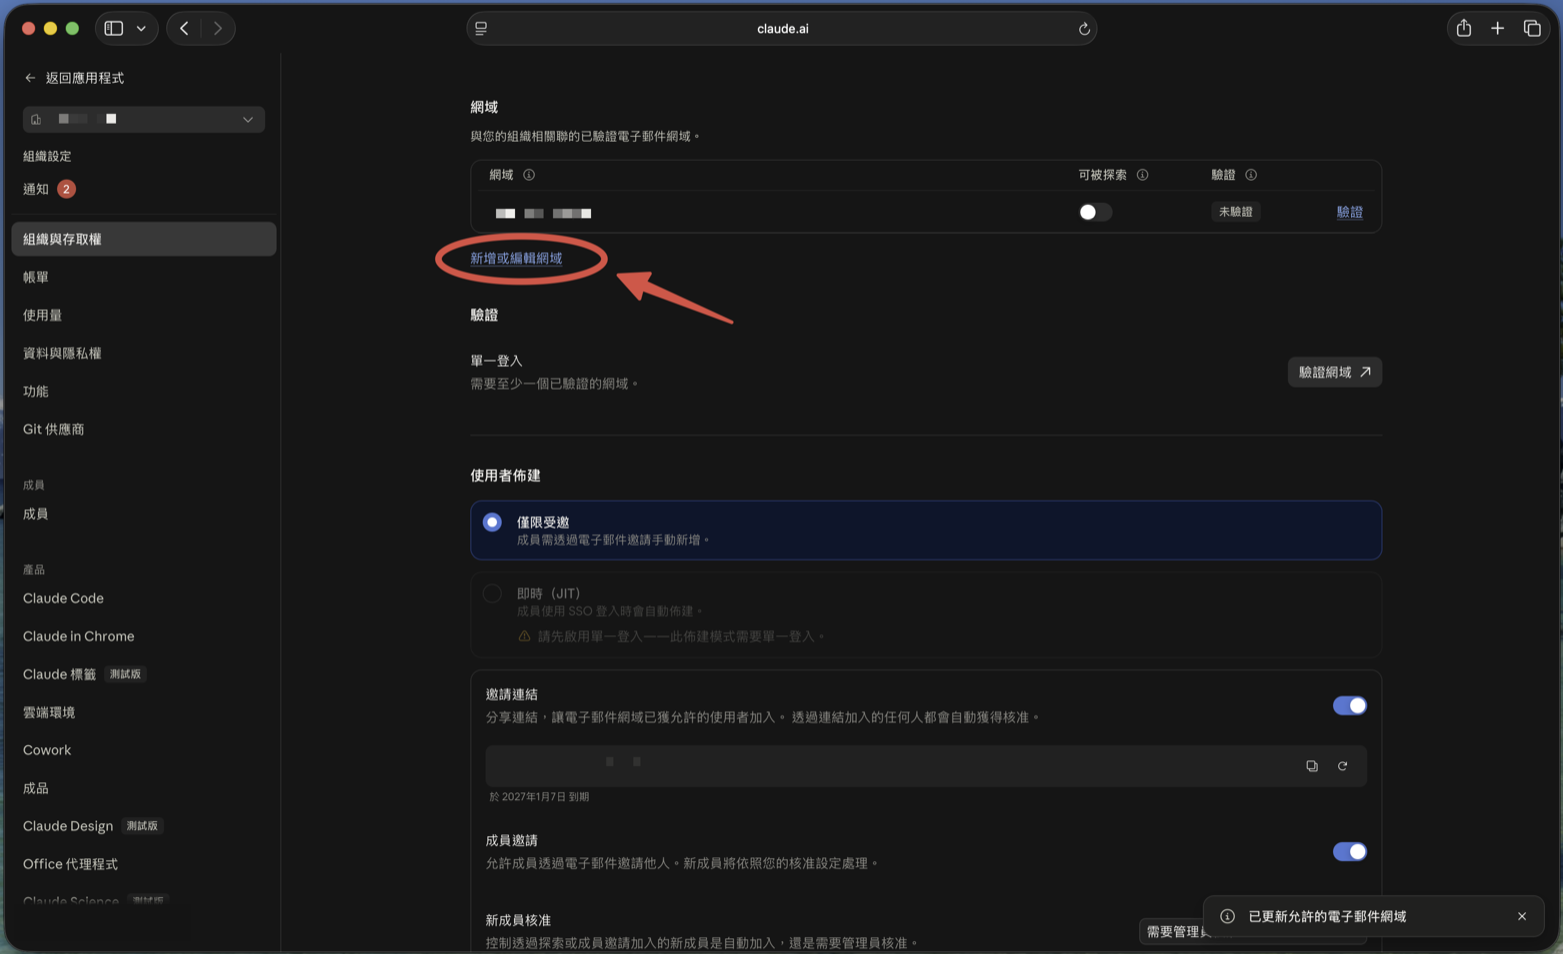
- In the “Update organization email domains” dialog, type
gmail.com, click +, then Save - Back in the domain list,
gmail.comnow appears
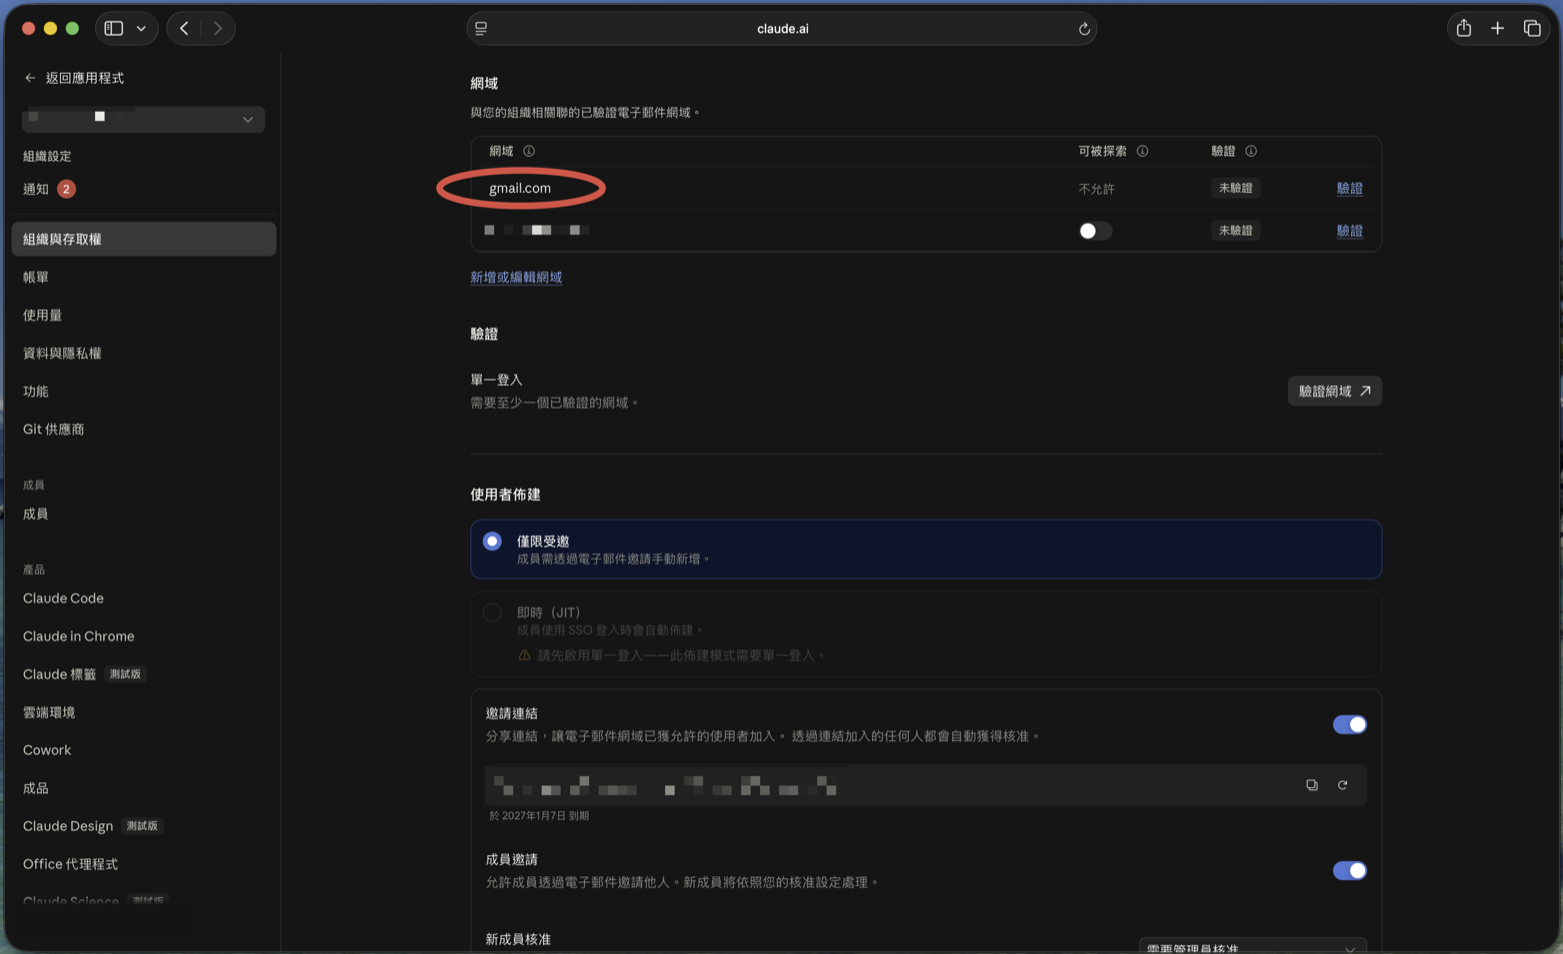
Public email domains like gmail.com show “Discoverable: Not allowed” — meaning random Gmail users can’t find your team by searching. That’s expected.
Step 10: 🔴 After adding Gmail, turn off the invite link
Skipping this won’t cause an error, but it can cost you money.
Scroll down to User provisioning and you’ll find two switches:
- Invite link: “anyone who joins via the link is automatically approved” — as long as their email domain is on the allowed list
- Member invites: lets regular members invite other people
Now connect that to the previous step: gmail.com on the allowed list + invite link on = any Gmail user in the world who gets this link can join automatically and occupy a paid seat. One forward and it’s out of your hands.
So unless you have a specific need, turn both off and have an owner invite people one by one by email:
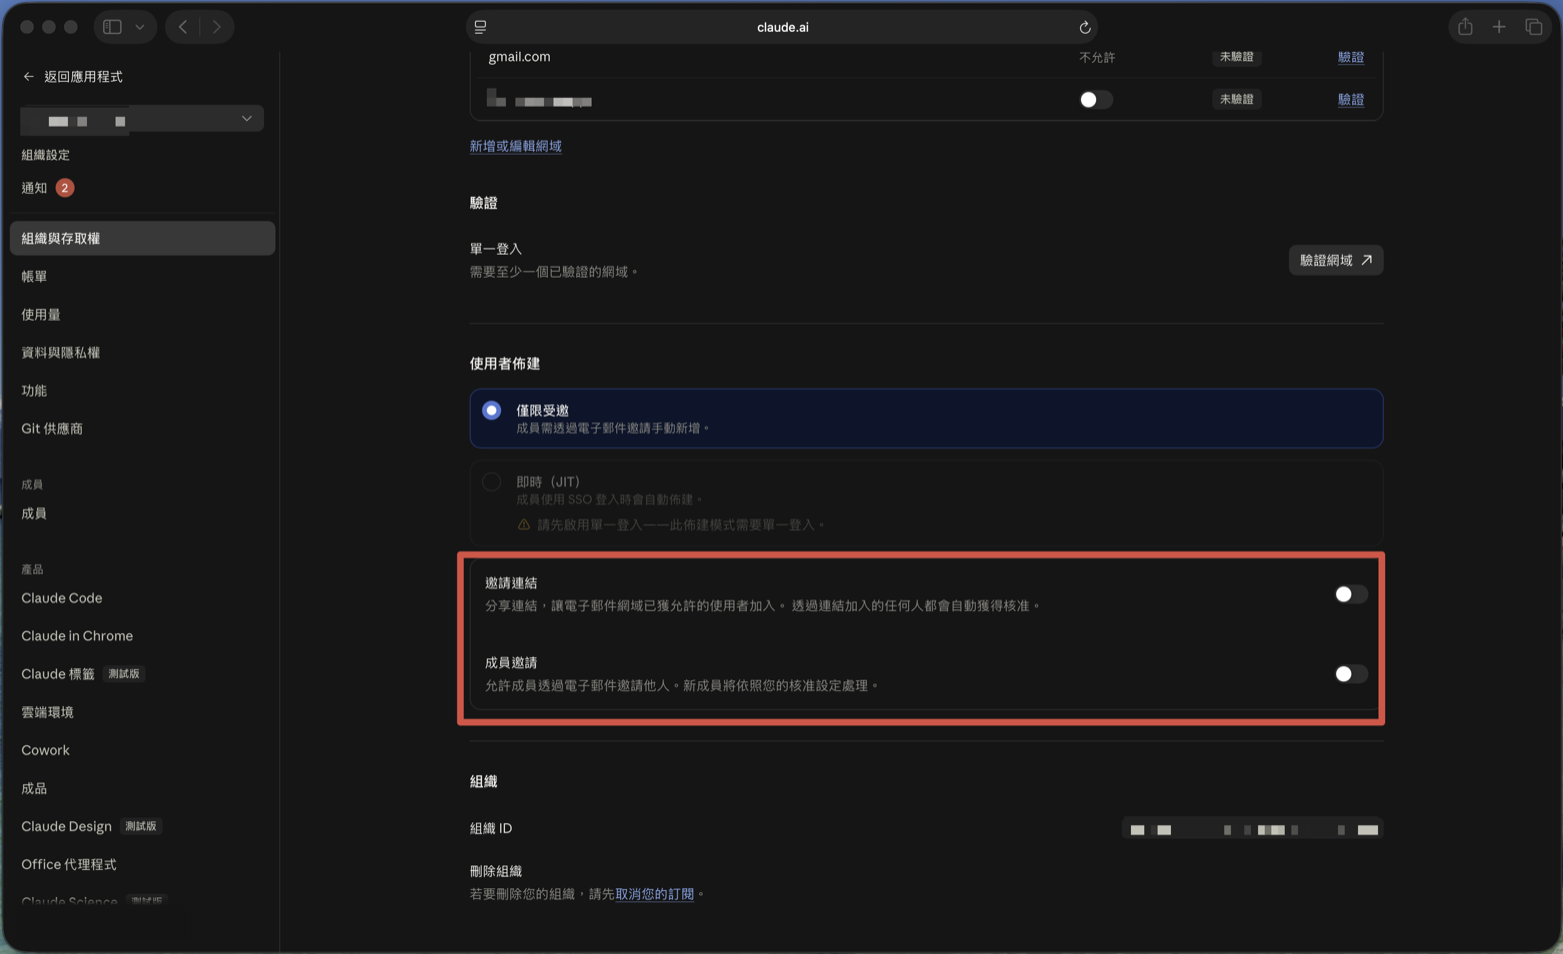
gmail.comis on the list, it means “anyone with a Gmail address who knows the code walks in and gets an employee badge automatically.” If you want someone in, invite them yourself.
Step 11: Members get the email and accept
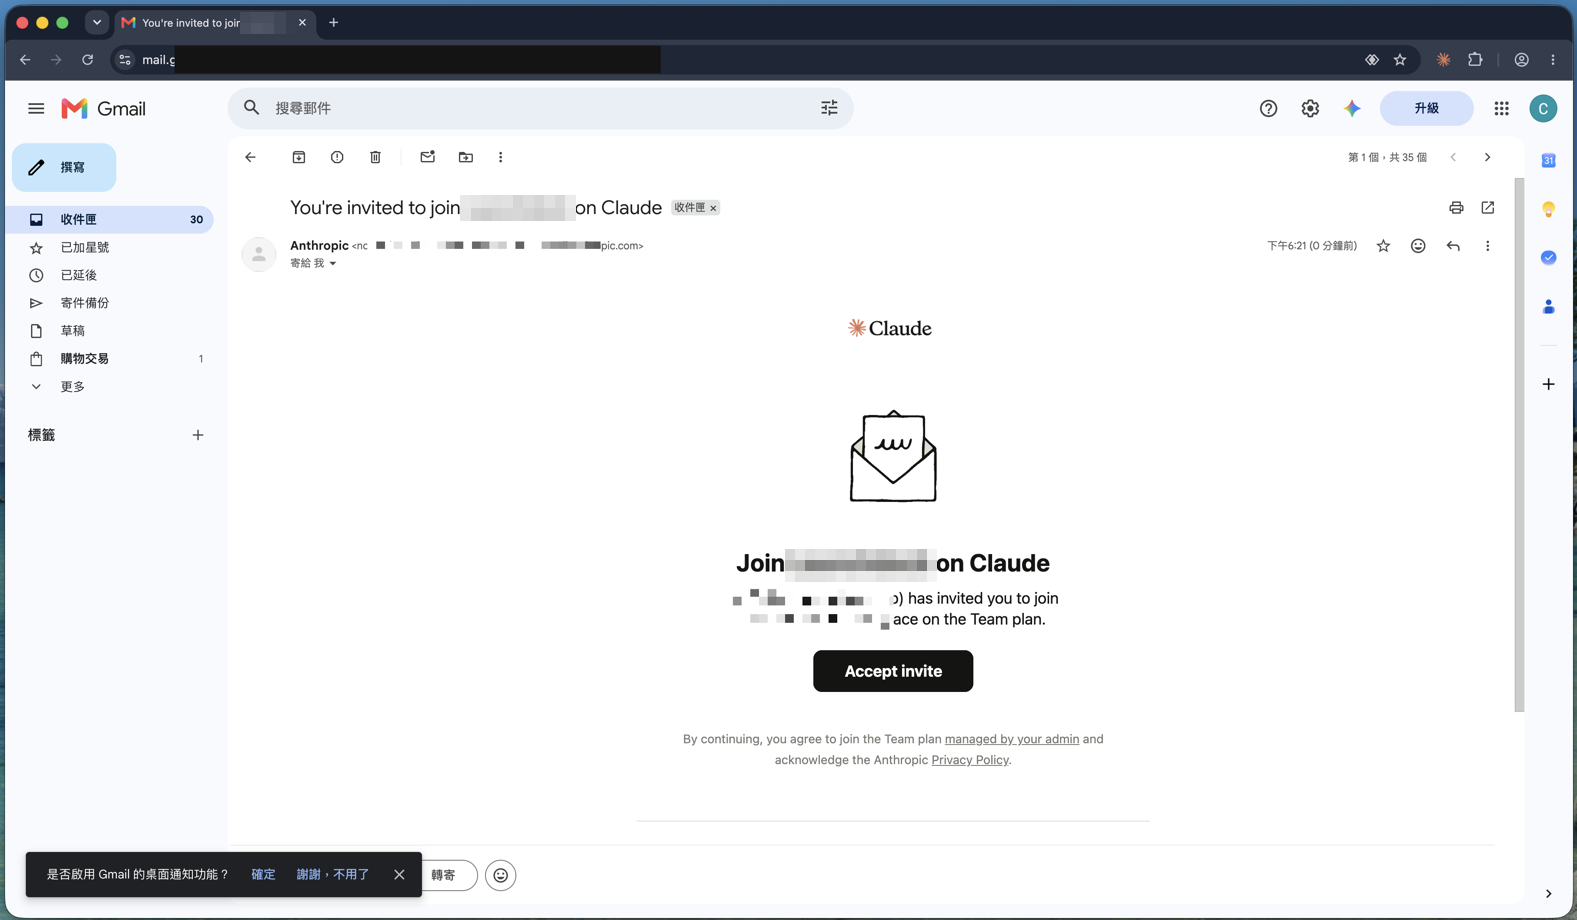
Invited coworkers receive an email titled You’re invited to join (team name) on Claude. They click Accept invite:
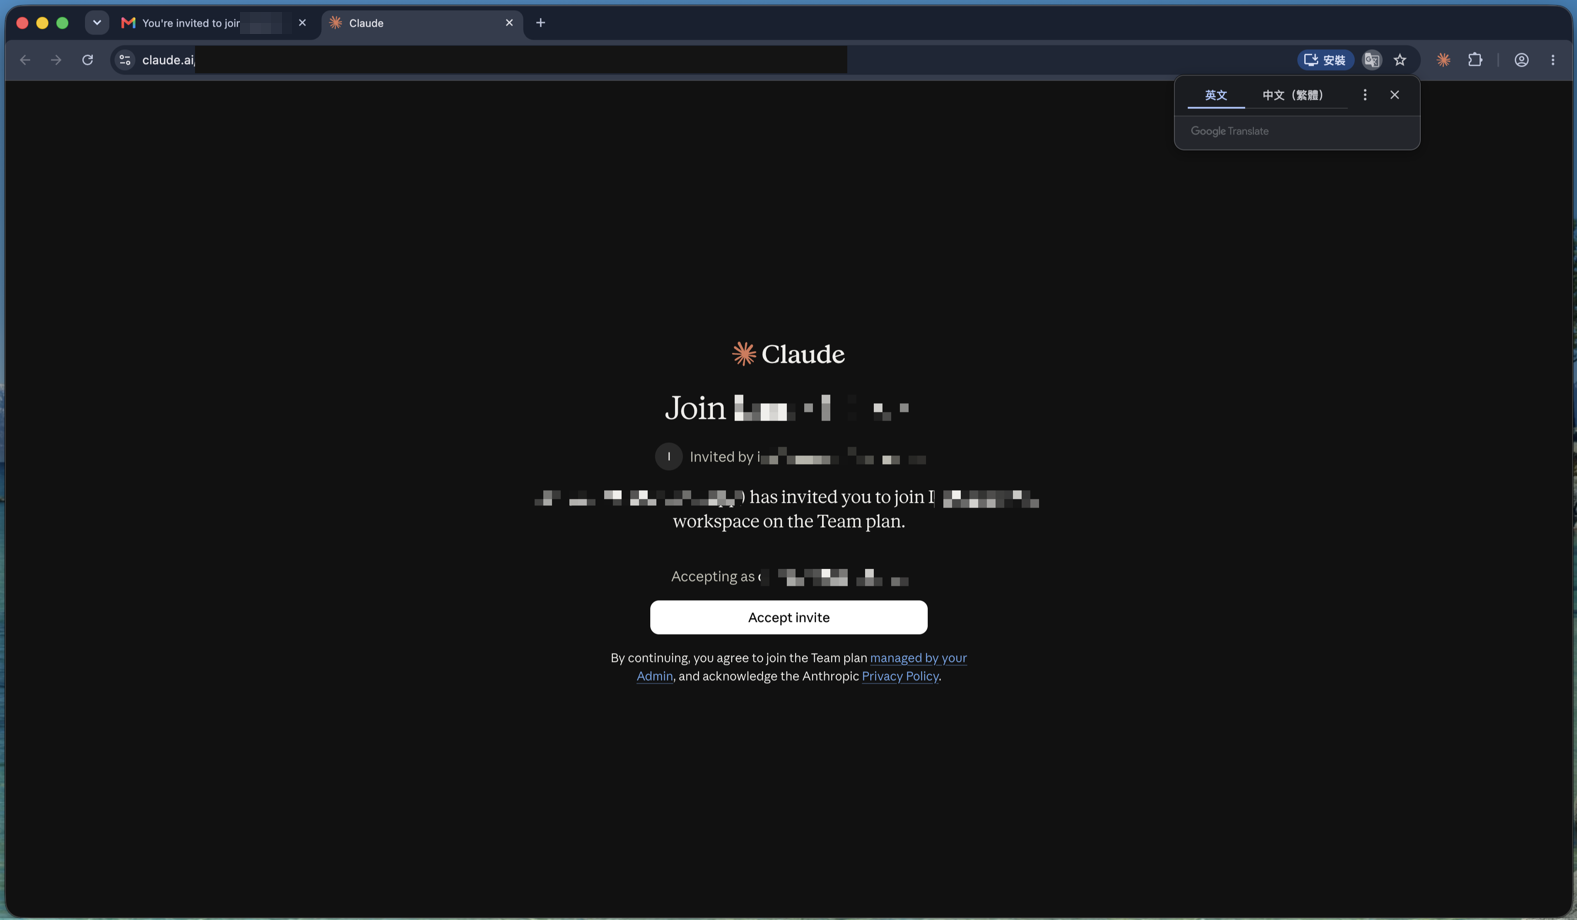
The browser opens the join page. Before clicking, check the email after “Accepting as” — if the browser is signed in to a different Claude account, sign out and switch first, or they’ll join under the wrong identity.
Step 12: Decide whether to keep the personal account
If the coworker already had a personal Claude account, a “You’ve joined …” dialog appears with two choices:
- Keep both accounts: switch between the personal account and the team at any time. Most people pick this.
- Use (team name) only: the personal account closes and its paid individual plan (in this screenshot, Max) is refunded, usually within about 24 hours. You then choose what happens to old chats and projects.
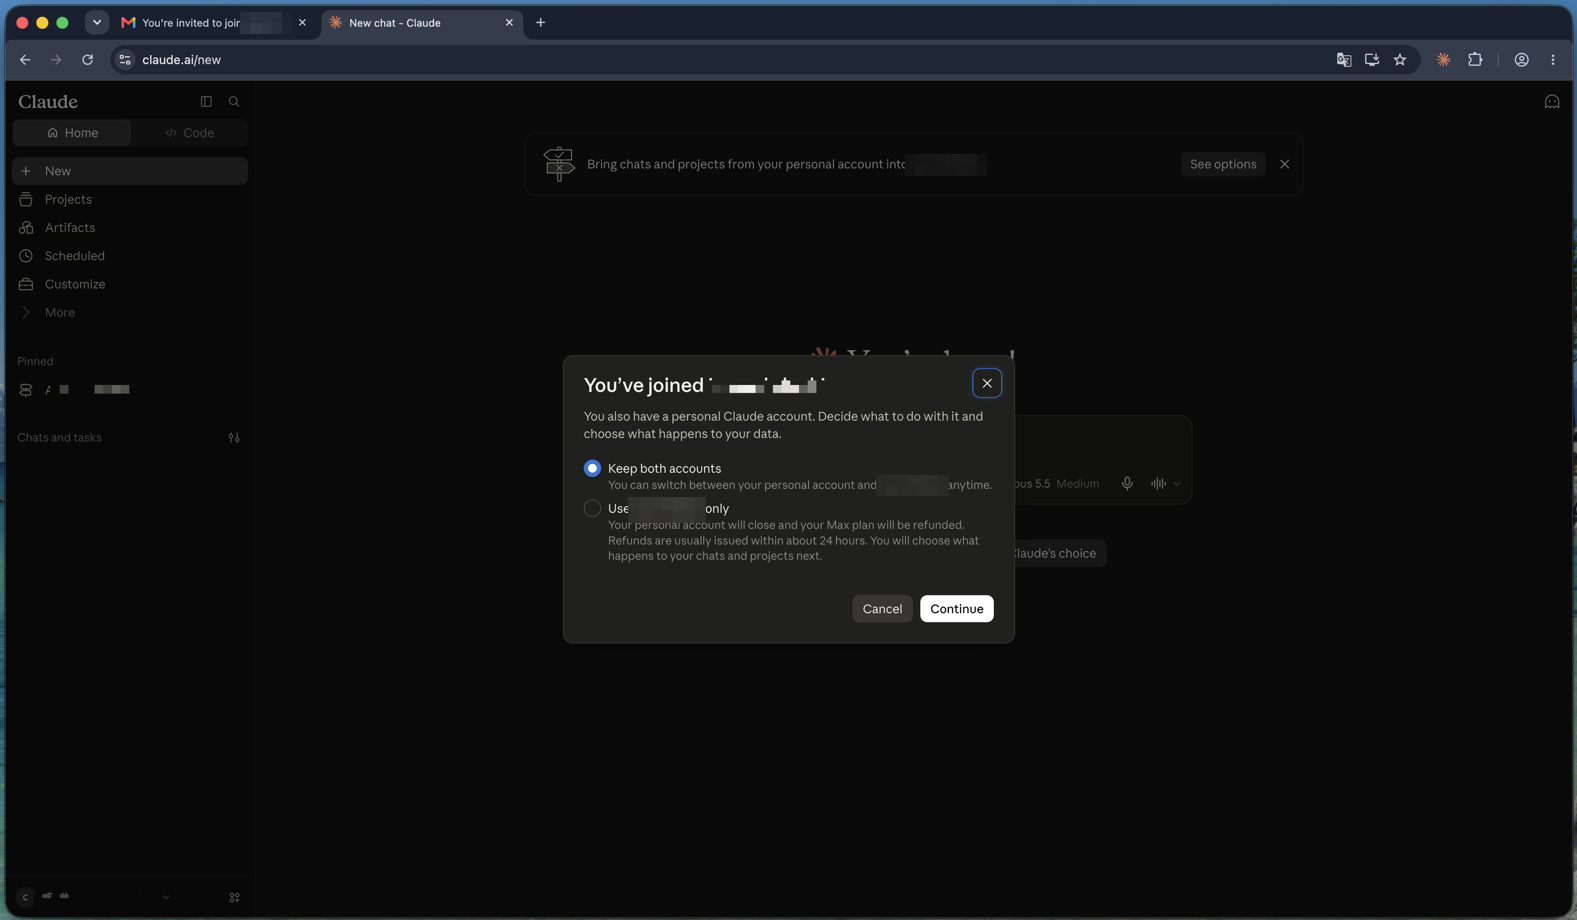
There’s also a banner at the top — “Bring chats and projects from your personal account into …”. To move work-related chats and projects into the team, use See options.
💡 If a coworker was paying for Pro or Max personally just for work, choosing “use the team only” gets that money back and stops the double payment. But it closes the personal account, so make sure there’s nothing private in it they want to keep.
🚨 Common problems and fixes
The invite won’t send / the button stays grayed out
Almost always: the email domain isn’t on the allowed list. Go back to Step 9, add their domain (e.g. gmail.com, or a partner company’s domain) to allowed email domains, and invite again.
I can’t find the Team plan
The upgrade page opens on the “Individual plans” tab. Team is next to it, under Team & Enterprise (Step 3).
The checkout total doesn’t match the plans page
The plans page shows prices including tax, usually on annual billing as a monthly average. Checkout lists a pre-tax subtotal plus VAT, and defaults to monthly. Monthly costs about 20% more than annual, so a mismatch is expected.
My old chats disappeared after joining
They’re still there — you’re just in the team workspace. Click your account name in the bottom-left to switch back to your personal account (if you chose Keep both accounts in Step 12).
Can one person open a Team plan?
No. Team requires at least 2 seats, and you’re billed for at least 2. If it’s just you, individual Pro or Max is the better deal.
What you can do now
- Upgrade from the account menu and find the Team plan on the second tab
- Understand the price gap between Standard and Premium seats, and choose monthly or annual
- Invite members and handle outside domains like Gmail
- Know to turn off the invite link after adding
gmail.com, so strangers can’t take your seats - Help coworkers decide what to do with their personal accounts
Next step: once the team is set up, the most valuable thing to do first is write your organization instructions, so Claude answers in the same voice and follows the same rules for everyone. For how to write them, see How to Set a System Prompt in ChatGPT, Claude, Gemini & Grok. The idea is identical; the scope just grows from you to your whole team.
👥 How do members join? If you are the one being invited, see How to Join a Claude Team You’ve Been Invited To.
這篇文章對你有幫助嗎?
💬 問答區
卡關了?直接在這裡問,其他讀者和作者都能幫忙解答。
載入中...
Found this useful? Share it with a friend who’s also getting their hands dirty
Share on LINE